00 Introduction and Installation
Welcome to the DeepMay Python crash(ing out) course! We’ve prepared a set of modules to help us all learn Python. We don’t expect you to know everything in these guides when you arrive and we will surely cover a lot of it in person.
Our goal is to make sure that when we arrive at camp, we are not seeing the basic elements of Python for the first time and hope that these can serve as a reference when questions arise. These modules are written for an audience brand new to coding but can also help programmers unaccustomed to working in Python make the jump.
Try not to be intimidated. The early modules will tend to be longer than the later modules and it will get easier and more exciting as we go along. This guide covers installation and getting started with a text editor and in subsequent modules we will learn all of the major things we need to know to start building rad shit.
Installing a Python installer
Installing Python can be surprisingly painful. All of our operating systems depend on Python to function. We need to rely on external tools to manage Python installations so that our operating system can rely on having access to the version of Python it expects to use. Effectively, we will be installing additional version(s) of Python that will be fully independent of our operating system’s Python. The authors of these modules have experience ruining an OS by trying to install things manually like tough guys—its not worth it.
Instead, To perform and manage these installations—as well as manage the external packages we
will be using later—we will be using a tool called uv. We can install uv by following the
official installation guide.
Once installed we can go ahead and start doing Python stuff. Let’s make sure it works by following a few steps to get a Python script running.
Setting up a Python project
First, we’ll create a new uv project called python-prework. A project in uv is a directory
with some specifications including which Python version to use and which of external packages our
project will need to work. We don’t need to explicitly install Python in our project, uv does
that for us.
Throughout these guides, we’ll see a couple of different types of code blocks. When a line in one
of these code blocks starts with $ that means it is a command to enter into our terminals and
lines in the same block without the $ represent the resulting output. We’re about to look at our
first one.
First we’ll make a directory (mkdir) in our home directory where we can keep track of all of our
DeepMay stuff then we will move into that directory (cd).
$ mkdir deepmay2026
$ cd deepmay2026
Now we can use uv to make our prework project.
$ uv init python-prework
Initialized project `python-prework` at `.../python-prework`
Your output will not look exactly like this, instead of the ... you should see a path to where
you’ve just created the uv project. uv has now created a directory with a bunch of stuff in it.
Let’s take a look at what’s in there.
$ cd python-prework
On linux or mac we can list all files (including hidden or “dotfiles”) in the current directory
using ls -a. On Windows, we can do the same by using dir /a in command prompt or la -Force in
PowerShell. Regardless you should see the same few things. We should have a directory structure
that looks like this:
|-- .git/
|-- .gitignore
|-- .python-version
|-- README.md
|-- main.py
 -- pyproject.toml
First we’ll breifly discuss the hidden files that we don’t need to care about for now. We can look
at the text files using cat in Linux/MacOS or type in Windows.
.git/: This is a directory that tells your system that the parent directory (.../python-prework/) is a git repository and contains git-related information. We’ll probably never have to touch this..gitignore: This text file tells git what not to keep track of. Depending on the track we may or may not need to edit this file.python-version: This is a simple text file that contains the version of Python we want to use for our project. By default it should .contain the text “3.12” and nothing else. Thats fine.
Ok now let’s look at the stuff we do care about.
main.py: This is our first (of many) Python scripts. We’ll run it in a second and learn how to understand all of it in the first few modules of this preworkpyproject.toml:tomlstands for “Tom’s Obvious, Minimal Language”. It is a type of structured text file used mostly for configuration files of various types.uvuses this file when running scripts and building projects to know how to set things up behind the scenes We’ll use this file when it comes time to add external dependencies to get new functionality in Python.README.md:mdstands for markdown which is another structured text specification often used for writing documents. We can use it to keep notes or describe our project and it can be easily converted into other types of documents like html or pdf. In fact, this document is written in markdown.
Running a Python script
Our default uv project includes a sample script which we ought to be able to run right away.
While you might see examples online where people use python scripts by invoking the python
command directly in the terminal, with uv we’ll use the uv run command. Let’s try running the
sample script.
$ uv run main.py
Using CPython 3.12.3 interpreter at: /usr/bin/python3.12
Creating virtual environment at: .venv
Hello from python-prework!
The output we expect from our script is the final line in the code block above. The prior two lines
will only appear the first time we use uv in a project. These two lines are just a little bit of
reporting on what uv is doing behind the scenes to install and use Python in a way that is
isolated from our operating system’s Python as discussed at the start of this module.
If we run our script again, we won’t see these reports.
$ uv run main.py
Hello from python-prework!
We can see evidence of some of the changes that uv has made by looking at the contents of our
project directory with the commands we’ve previously discussed. There should be two new items in
our directory:
uv.lock: This is just another toml file detailing the state of our project’s Python setup.venv/: This directory contains a whole bunch of stuff relating to our project’s installation and dependencies.
Both the newly created lock file and the .venv/ directory are really none of our business. They were
created by uv and they will be modified by uv, we never have to touch them directly.
Installing an editor
All that’s left to do with our new setup is write a Python script of our own. In order to do so, we’re going to need a good text editor.
By far the most popular text editor for coding is Microsoft’s VS code. Something like 75% of software developers use it. On its own, VS code offers a lightweight coding experience that is highly modular allowing us to add additional functionality like automatic code formatting and visual customization.
If you want to avoid using Microsoft’s products, we recommend VSCodium. VSCodium essentially takes the open source part of VS code and removes all of the Microsoft specific stuff.
For the sake of learning, we should be using one of these two editors. Moving forward we will assume that we are all using VS code or VSCodium if and when editor settings and functionality come up.
Whichever way you choose to go, make sure you have one of these editors installed by following the appropriate installation guide on the linked websites. Once installed we can open either VS code or VSCodium from our terminal. Let’s open our project directory in one of these editors. Navigate to our new project directory and open your editor with this command:
$ code .
or
$ codium .
When we run this command, we should see something like this (this is VS code but codium is similar). We might have to first click something like “Yes I trust the people who made this directory”.
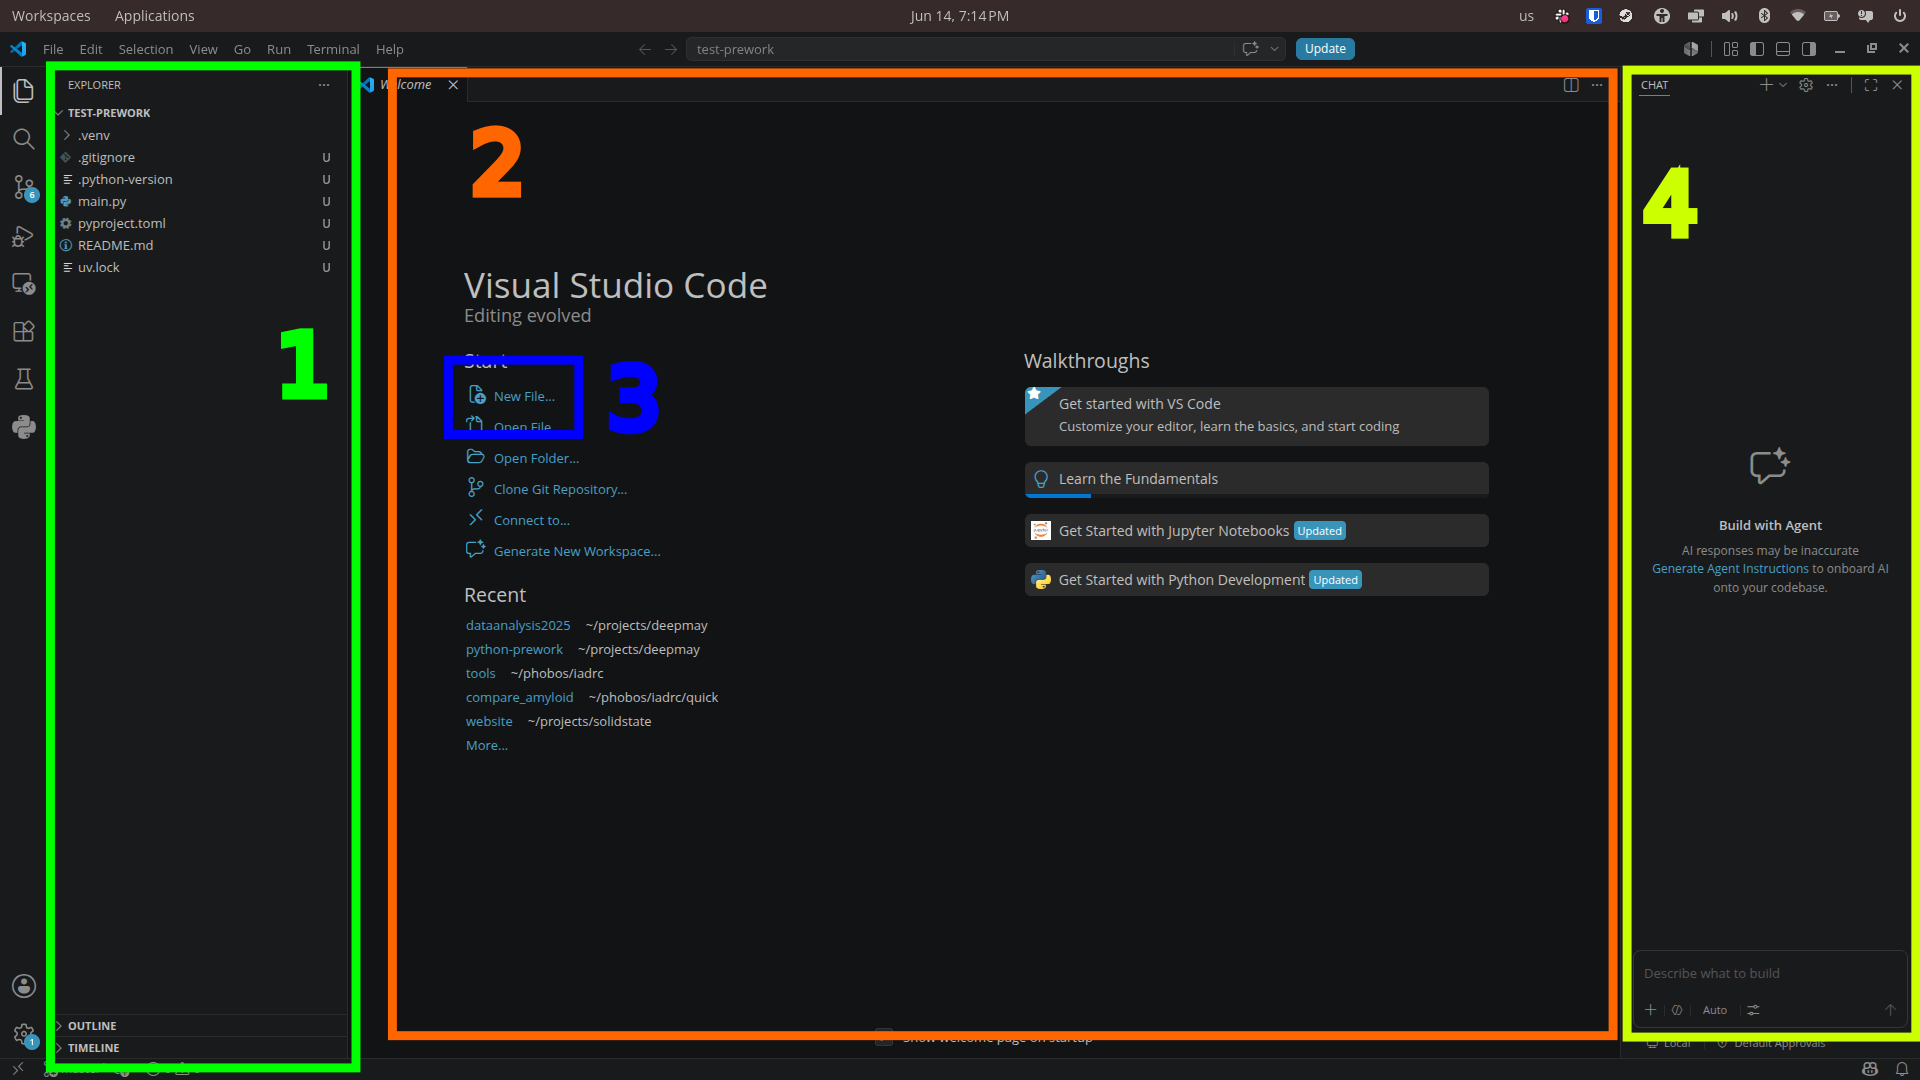
We’ve annotated some key areas to help you orient yourself but its worth clicking on things and poking around to see what all is going on.
- The left pane is the file explorer. It shows you a file system starting from where you openned the editor. You should see all of the files and directories we’ve previously discussed and clicking on one of them will open it.
- The middle pane is the main editting section. When you open a file it will occupy this space.
- This is a new file button. You can also make a new file with a button at the top of the file explorer pane or by right clicking somewhere in the file explorer or using the File dropdown menu.
- AI chatbot pane. We can probably close this one.
While there are far too many hotkeys to get into, there is one we want to introduce now. Ctrl + ~ will open or close the editor’s integrated terminal. This allows you to run terminal commands from within VS code/VSCodium without having to switch between windows.
Writing our first script
Alongside the code blocks showing terminal inputs and outputs, we’ll also use code blocks to denote content of Python scripts. Often we’ll see two code blocks in a row, one showing the content of a script and the next one showing how to run the script and what the output should look like.
Code blocks that contain Python scripts will always have, as their first line, a comment with the
name of the script so that we don’t get too confused. Comments in Python are any line that begins
with # and Python will ignore them when we run a script.
Let’s make a new file called hello-world.py. the .py extension tells us that the file is a
Python script. Put the
# hello-world.py
print("hello world")
$ uv run hello-world.py
hello world
Our script here only has a single line, in it we use the built-in print function to show some
text in our terminal. We’ll see the print function a lot.
Congratulations, you are a coder!
Summary
In this module, we covered how to install Python using uv as well as install and get started with
a solid text editor. We’ve run scripts and even written our own.
Experimentation is an important part of learning, especially in programming. Once we have our installation set up, its nearly always worthwhile to deviate from our guide and try things. One of the most fun parts of programming is that the consequences for breaking our code are very small. Throughout these modules, the worst case scenario for scripts failing is that Python will give us an error message with a bunch of stuff angrily underlined in red. Seeing how scripts fail is a key part to developing our understanding.
Moving forward we will learn all of the basic concepts needed to start writing sophisticated programs in Python so that we can hit the ground running when we get to camp.
See you at camp.